

Are you tired of tripping over your garden tools in the garage or struggling to find space for them in your outdoor storage? It may be time to consider building a storage shed for your garden tools. Not only will this free up space in your other storage areas, but it will also keep your tools organized and easily accessible.
In this blog post, we will guide you through the 10 steps on how to build a storage shed for garden tools, so you can have a functional and efficient space for all your gardening needs.
Table of Contents
Evaluating your needs and planning the shed
When it comes to building a storage shed for your garden tools, it’s important to evaluate your needs and plan accordingly. First, it is important to consider the amount of space you have available in your yard or garden. If you have limited space, a small garden tool shed might be the best option. These sheds are compact and can fit into smaller areas without taking up too much space.
Next, think about the materials you want to use for your shed. A garden tool shed can be made from various materials such as wood, metal, or even plastic. Each material has its pros and cons, so choose the one that suits your preferences and budget. If you’re looking for a low-maintenance option, a garden tool shed plastic might be the way to go.
Finally, think about the specific tools you want to store in your shed and plan the layout accordingly. Consider how much storage space you need for each tool and whether you want additional shelves or hooks for organization. Taking the time to evaluate your needs and plan the shed will ensure that you build a functional and efficient space for all your gardening needs.
Materials needed for building storage shed for garden tools
When it comes to building your own storage shed for garden tools, you’ll need a few essential tools and materials to get started. First and foremost, you’ll need a sturdy foundation, which can be made using concrete, cinder blocks, or gravel. You’ll also need pressure-treated lumber for the shed frame, as it is more resistant to rot and decay.
In terms of tools, you’ll need a tape measure, circular saw, drill, level, and a framing square. These tools will help you accurately measure and cut the materials, as well as assemble the shed.
Don’t forget safety gear such as safety glasses, work gloves, and a dust mask to protect yourself during construction.
Additionally, consider the specific features you want to include in your shed. This might include shelves, hooks, or even a window for natural light. Take into account any additional materials needed for these features, such as brackets, screws, or insulation.
Building a small garden tool shed is a rewarding DIY project that can be accomplished with the right tools and materials. Whether you opt for a garden tool shed made of plastic or decide to go the traditional route with wood, gathering the necessary tools and materials will ensure you have everything you need for a successful project.
Step-by-Step Guide to Building Garden Tool Storage Shed
Building a garden tool storage shed may seem like a difficult task, but with the right step-by-step guide, it can be a rewarding DIY project. In this section we have provided 10 steps which you can follow to succesfully build storage shed for your gardening tools.
Step 1: Cutting and Straightening the Boards
Start by gathering your lumber. Measure twice, cut once. Use a saw to cut the boards to the lengths you’ve marked. Check your edges with a square and smooth them out with a planer for a clean finish.
Step 2: Making the Mortise and Tenon for the Walls and Floor
Now, for the joints. Think of it like a puzzle. Use a mortising machine or chisel to carve out slots (mortises) in one board and corresponding projections (tenons) on another. They should fit snugly together. Take your time to get these right.
Step 3: Preparing the Boards for the Front Wall
Time to customize! Lay out your boards for the front wall. If you want windows or doors, mark and cut those out carefully. Sand the edges so everything looks neat and feels smooth.
Step 4: Making the Corner Pillars
The corner pillars are like the backbone of your shed. Cut them to the right height, and if you’re feeling fancy, add some decorative details. Make sure they’re perfectly square.
Step 5: Cutting the Roof Boards
Measure twice, cut once—again. This time, it’s for the roof. Get those angles right, so when it all comes together, it fits like a charm.
Step 6: Assembling the Frame of the Shed
Time to put the puzzle pieces together! Lay out the floorboards and connect them using those mortise and tenon joints. Anchor the corner pillars securely. This is the foundation of your shed.
Step 7: Installing the Floor
Place your frame on a level surface and anchor it down. Lay the floorboards in place, making sure they’re level and secure. This is what your shed stands on, so take your time here.
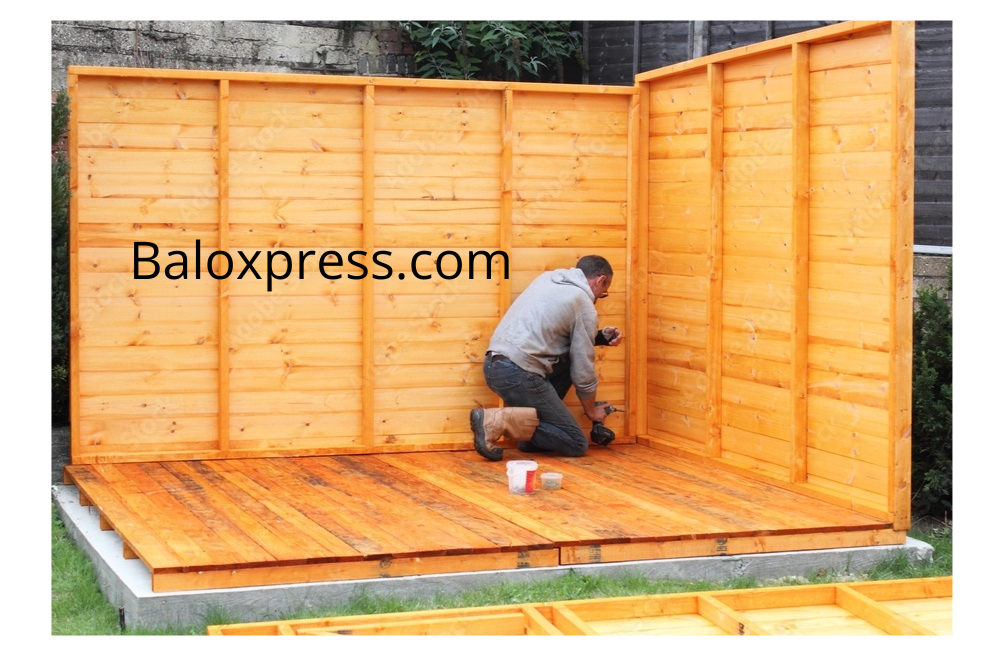
Step 8: Assembling the Walls
Stand your walls up and connect them using those mortise and tenon joints again. Check that everything is straight and secure. Don’t forget to attach the front wall with any openings you prepared earlier.
Step 9: Installing the Roof and Covering It with Shingles
Get ready to cap it off! Position the roof boards and secure them. Trim any excess. Now, protect it from the elements. Install roofing felt and cover it with shingles. This is the hat that keeps everything dry inside.
Step 10: Building the Door
Last but not least, the entrance. Measure and cut the door frame components. Create the door using those mortise and tenon joints. Install hinges and a latch. Make sure the door fits snugly.
You can watch this video below, for better undertsnding on how to build a storage shed for garden tools
What size is best for garden tools storage shed?
When it comes to determining the size of the shed that is best for your garden tools, there are a few factors to consider. First, take an inventory of the tools you plan to store in the shed. This will help you determine how much space you will need. If you have a small collection of tools, a compact garden tool shed might be sufficient. These sheds are typically around 6×4 feet and can easily fit in a smaller yard or garden.
However, if you have a larger collection of tools or plan to store larger equipment like a lawnmower or wheelbarrow, you may need a larger shed. Consider a garden tool shed plastic, as it is a durable and low-maintenance option.
Ultimately, the size of your shed should accommodate your current needs while leaving room for future growth. So whether you choose to build a DIY tool shed or opt for a pre-made option, make sure to carefully consider the size to ensure you have enough space for all your garden tools.
RELATED: How do you store tools in a garden shed
Safety Measures to Consider When Building Your Garden Tools Storage Shed
When building your garden tools storage shed, it’s important to prioritize safety to ensure a smooth and accident-free construction process. Here are some safety measures to consider:
- Wear protective gear: Before you start any construction work, make sure to wear safety glasses, work gloves, and a dust mask. These will protect your eyes, hands, and lungs from potential hazards.
- Follow proper tool handling: Handle all tools with care and ensure they are in good working condition. Keep blades sharp and properly adjusted, and always use tools as intended to avoid accidents.
- Use proper lifting techniques: When lifting heavy materials or equipment, remember to lift with your legs, not your back. Use a dolly or get assistance when moving heavy objects to prevent strains or injuries.
- Secure the structure: As you build the shed, ensure that all components are securely fastened and level. Use clamps or temporary braces to hold pieces in place during assembly.
- Avoid working in unfavorable weather: If the weather is stormy, extremely hot, or icy, it’s best to postpone construction until conditions are more favorable. Working in unfavorable weather can increase the risk of accidents and injuries.
By taking these safety measures, you can build your garden tools storage shed without any mishaps, ensuring a safe and successful project.
Tips on maintaining your garden tool storage shed
Once you have built your garden tool storage shed, it’s important to properly maintain it to ensure its longevity and functionality. Here are some tips on how to maintain your garden tool storage shed:
- Regular cleaning: Keep your shed clean and free of debris. Sweep or hose out any dirt, leaves, or grass clippings that may accumulate inside. This will help prevent moisture buildup and potential damage to your tools.
- Check for leaks: Inspect your shed regularly for any signs of leaks or water damage. Repair any leaks promptly to prevent further damage to the structure or your tools.
- Prevent rust: If you have metal tools or equipment stored in your shed, apply a rust-resistant coating or oil regularly to prevent rusting. This will help prolong the life of your tools and keep them in good condition.
- Maintain organization: Keep your tools and equipment organized inside the shed. Use shelves, hooks, or pegboards to keep everything in its place and easily accessible. This will not only help prevent accidents but also make it easier to find and retrieve the tools you need.
- Inspect for pests: Regularly inspect your shed for any signs of pests such as rodents or insects. Take measures to prevent them from entering and causing damage to your tools or the shed itself.
By following these maintenance tips, you can ensure that your garden tool storage shed remains in great condition, allowing you to enjoy its benefits for years to come.


